
Creating Clean Tables with DataTables

When learning to design webpages one of the earliest hurdles the average learner will come across is visualizing datasets in a time-efficient way. HTML has some built in features that allow the skeleton of a static table to be styled but to implement any kind of QoL the user needs a fair understanding of scripting languages like Javascript as well as development libraries to bridge the gap (jQuery, React/Redux etc). Thankfully there are myriad data visualization tools out there for most major languages. As a primarily JS focused dev, when I need to implement a feature-rich table “out of the box” I use DataTables. Here’s how we set it up.
Inside our page we add cdn links to jQuery and dataTables, as well as their stylesheets. Load order is important here, especially for the stylesheets. It’s also highly recommended in today’s mobile-first landscape to use the “Responsive” addon for dataTables, so we’ll add it as well. Inside our <head> element:
    <link rel="stylesheet" href="https://cdn.datatables.net/2.0.7/css/dataTables.dataTables.min.css">
    <link rel="stylesheet" href="https://cdn.datatables.net/responsive/3.0.2/css/responsive.dataTables.min.css">
And now at the bottom of our <body> element, before our custom JS:
<script
      src="https://code.jquery.com/jquery-3.7.1.js"
      integrity="sha256-eKhayi8LEQwp4NKxN+CfCh+3qOVUtJn3QNZ0TciWLP4="
      crossorigin="anonymous">
  </script>
<script
      src="https://cdn.datatables.net/2.0.7/js/dataTables.min.js">
</script>
<script
      src="https://cdn.datatables.net/responsive/3.0.2/js/dataTables.responsive.min.js">
</script>
Now that we have our page set up and cdn links added, it’s time to declare our dataset and define our table. There are a number of different ways to format data for the table but we’ll start with static data. Be aware that if your data is nested to use bracket or dot notation in order to target that variable. For our example, we’ll have a number of entries all formatted like this:
const somePeople = [
   {
     name: "Santiago Ramirez",
     city: "Buenos Aires, Argentina",
     favoriteMonth: "December"
   },
// ...more entries
];
We make sure in our html we have an html <table> element with an id attribute we can target. We’ll also add a few classes here for styling and a width attribute so the table fills the containing element. Since our data is currently hardcoded in javascript, the table tags can be empty; we’ll tell dataTables how to format the data in a few steps.
<body>
// some other html
<table id="my-table" class="table display cell-border table-striped" width="100%">
  <thead>
           <tr>
               <th></th>
               <th></th>
               <th></th>
             </tr>
     </thead>
   </table>
// our various script tags
</body>
Then in Javascript, we declare the table using jQuery syntax.
<script>
 $(document).ready( function () {
        let table = $('#myTable').DataTable({
          // our settings will go here
        });
});
</script>
Now that the table is declared, we can programmatically tell it which data to use, our exactly how we want our columns and to enable the “Responsive” addon. When working with an array of objects and declaring the columns, the “title” attribute can be anything you want displayed in the table head, but the “data“ attribute must be some key/value pair in the object, using normal object notation (for example, if our names were objects with first and last names as keys, they would be name.firstName and name.lastName).
$(document).ready( function () {
        let table = $('#myTable').DataTable({
          responsive: true,
          columns:[
            {title: "Name", data: "name"},
            {title: "City", data: "city"},
            {title: "Favorite Month", data: "favoriteMonth"},
          ],
             data: somePeople
        });
});
Now that the table is up all of the pieces can be styled with CSS like a normal html table, albeit with slightly more involved targetting. Lets say we need to match a particular page’s dark mode styles. We should add class=”dark” to our html tag for best-practice browser compatibility, then change our styles.
 html {
            background-color: rgb(58, 58, 58);
            color: whitesmoke;
        }

.table {
            border: 3px solid whitesmoke;
            border-radius: 6px;
        }
You can add alternating row colors for visual clarity.
.table-striped>tbody>tr:nth-child(even)>td,
.table-striped>tbody>tr:nth-child(even)>th {
        background-color: #585858;
      }

.table-striped>tbody>tr:nth-child(odd)>td,
.table-striped>tbody>tr:nth-child(odd)>th {
        background-color: #636363;
      }
We can also change the symbols used for different pieces of the table, for example our pagination. In the table function:
language: {
"paginate":{
"previous": "<span class='fa fa-chevron-left'></span>",
"next": "<span class='fa fa-chevron-right'></span>"
}
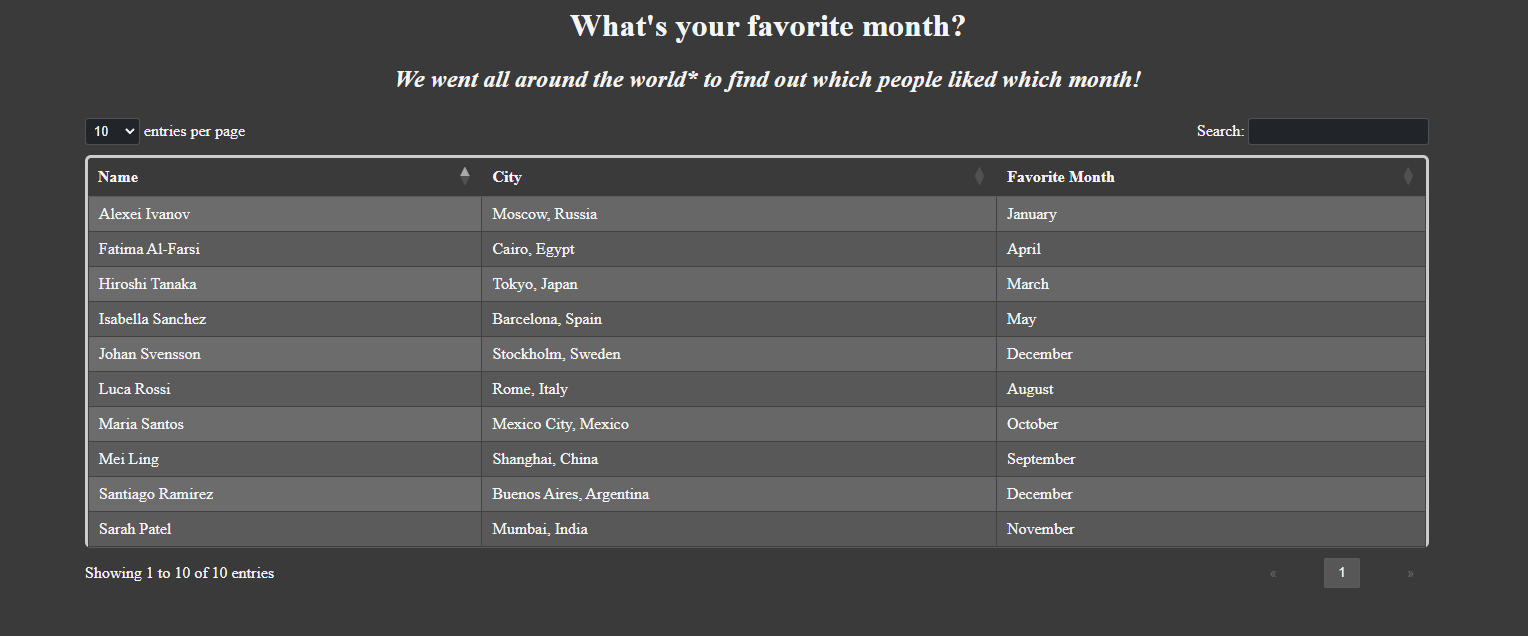
},With all of the above, the table should come out like this:
We have our table! This works out of the box with a number of useful features like a built in search function and the aforementioned pagination. However, there are plenty of other bells and whistles that can add sleekness to our page. We’ll go over those in part two!